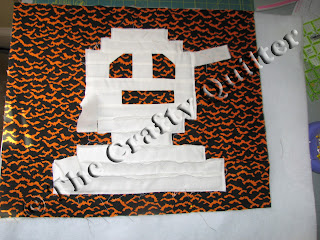
Here is the Halloween Tote I made up to go with my Spooky Halloween Quilt. Knowing my kids, mostly my daughter, I knew if I made a quilt for me to cuddle under as I pass out candy, she would "need" something for holding her goodies. I used an excessive amount of the Glow in the Dark thread on this face, but boy it it worth every stitch! It has a surprisingly bright glow at night. She is very excited about using it this Halloween!
Here is what you need to make one of your own...
Materials.
24 -- 2.5"x6.5" rectangles Halloween print
One -- 5" by WOF (Width of Fabric) cut of Halloween print for handles
One 18"X16" fabric for front background behind mummy
Three 1.5" by WOF cuts of White fabric.
Two 2.25"X2.5" inch black fabric for Eyes
One 1.5"X2.5" inch black fabric for mouth
Two - 1.5" squares white
One piece of fabric 32" X 18" for lining.
Two 18"x16" pieces of fusible fleece
One 5" X 40" piece of fusible fleece
Thread.
Assembling the Mummy:
1. Cut Three -- 4" long strips off of white 1.5" strips. These strips need to have the salvage edge on one end. They will be attached to the mummy sides to make it look like he is unraveling.
Cut 1.5" White strips into the following lengths.
-two 4.5" strips, four 6.5" strips, two 8.5" strips, one 9.5" strip, two 12.5" strips, one 3" strip,and one 2" strip.
2. EYES: Take 1.5" white squares and draw a diagonal line across the wrong side of the fabric with washable pen. Lay one square on upper right corner of one 2.25"X2.5" black fabric. Lay other square on upper left corner of second 2.25"X2.5" black fabric. Sew along diagonal line. Press white triangle back. Set aside.
4. Take one 1.5"X3" white strip sew to left side of 1.5"X2.5" black strip for mouth. press seam open. On right side of black strip sew 1.5"X2" white strip. Press seams open.
5. Take remaining white strips and lay out mummy head and shoulders as shown. Sew remaining mummy pieces together so seams are on the outside, press seams open.
6. Once Mummy Head is fully assembled, lay mummy onto front 18"X16" piece of background fabric. Place bottom edge of mummy 1.5 inches above bottom edge of fabric. Place the three 4 inch strips with salvage edge at various spots around edge of mummy. Once they are in desired location, top stitch mummy head and shoulders onto background fabric.
(optional: for additional 3-D effect you can add a layer of batting between mummy and background before mummy is sewn on.)
7. Take one 18"X16" piece of fusible fleece and fuse to wrong side of background fabric. Stitch around edge. Quilt bag front as desired.
Bag Back Assembly
1. Take 24 -- 2.5"X6.5" strips and lay them out as shown. Sew and press rows together to make one piece 18"X16".
2. Fuse Fleece to wrong side of bag back. Quilt as desired.
Bag assembly.
1. With right sides facing, pin bag front to bag back. sew around sides and bottom of bag, leaving top open.
2. Box in bottom corners of bag.
Leaving bag front and back wrong sides out. Lay bag so bottom seam is lined up with right side seam. (if you have never boxed in a bag bottom before it can be confusing.) There are many great tutorials online to help. I like this one. from Lazy Girl Designs. The only change I make is I do not cut out the corner until after I have sewn it.
Once bag seams are aligned. mark a line 1.5 inches from corner of bag. Sew across line twice. Trim off corner. Repeat on other side.
3. Fold Lining fabric in half making a piece 18"X16". Pin sides and sew. Box corners as shown above.
4. Take 5 inch X WOF piece for handles and fuse fleece to wrong side. Once fleece is fused, fold fabric in half along width and press.
Open handle and fold sides into center seam and press a second time.
Without unfolding, Fold handle once again on center crease. Pin and sew along both sides.
Once handle is sewn, cut length in half. Now you have 2 handles.
6. Take bag exterior and turn right side out. Being careful not to twist handles. Pin front handle 5 inches in from both sides. Sew to bag. Turn bag to back and repeat with handle for back.
7. Take bag exterior with handles securely sewn on and place inside lining, right sides together. Pin top edges, leaving a 4 inch opening for turning. Sew around bag top, taking care to catch handle ends in seam. Turn bag through opening.
Once bag is turned, right sides out, top stitch around upper edge a scant 1/8 inch from edge, closing opening as you do so.
Now your little goblin is ready for some serious trick-or-treating.


1 comment:
Cute!!!
Post a Comment