Yesterday was just another day in the life of this busy family. After school we had homework, snacks, laughter and tears. We had supper and took off like the crazies we are to events for all. I dropped Emma off at dance with a reminder that Daddy was picking her up. I told her if Daddy was not there when she got out, she needed to sit in the waiting room and wait for him. I didn't want her outside. Her response, "Sometimes, Daddy runs late. I know." She even made those little bunny ear quotes around "runs late" as if to say, that is what he calls it when he forgets to pick me up.
John took Jack to his middle school open house. A week ago Jack had asked us to please come to his open house. When I explained that Mark and Emma also had activities on this day and that only one parent could go he was in agony. He didn't want to choose. He said, "You cannot expect me to choose! That is like having to choose between Legos and Pokemon." It was a weekend long decision making process for Jack. He wavered back and forth for days. Finally impatient with his inability to make a decision I said, "Okay, I'll ask Mark who he wants to take him to soccer." and so I did. Naturally Mark chose Dad. Jack then promptly jumped all over Mark and I and said, "But, I want Dad to go with me!" AH-HA! The truth is revealed.
I was shipped off to watch Mark's soccer game. John, Jack and Emma did not have enough time to come out to the game, a fact which John hated and Jack and Emma LOVED. After the open house and dance were over John brought Jack and Emma back home. The kids were wild with the excitement of the day and John was tired. John encouraged them to play the piano for him, finish their homework, get snacks and take showers. At one point Jack and Emma were HYPER, that is the only word to explain it. John yelled at them to calm down and sent them upstairs to their rooms. Not 5 minutes later, I was told, Jack and Emma heard the loud beginnings of The William Tell Overture. They took off downstairs to investigate. When they saw that Dad was to blame Jack said, "This is not helping us calm down Dad." and Emma said, "I always knew you could be fun Dad. You just don't show it when you're with Mom!"
8.31.2011
8.30.2011
Mitered Corners (A Tutorial)
For the most part I stay away from Mitered Corners. I avoid them like I would many other unpleasant chores, I put them off until it is absolutely necessary. Truthfully, I have tried mitered borders a couple of times but they usually end up looking more like a pucker with a tiny hole in the center.

With this last quilt I decided mitered corners were a must! And they do enhance the 'diamond' effect of the quilt. In order to get my corners to lay flat, I had to look at mitered corners from a fresh perspective. For those of you who sew clothing this will make more sense. This is how I went about it.
Mitered Corners are nothing more than a 'dart'. The quilt borders has an excess of fabric around the circumference not unlike many of my daughters elastic waist pants. To get my daughters pants to fit correctly I have to sew darts in the waistbands of most, if not all of her shorts. This same principle I applied to the borders of my quilt.
The first step is to add extra length to your borders, meaning you have to measure. If you are a lazy quilter like me you typically don't measure the sides of your quilt. I usually hold up my fabric to the quilt and estimate the length I need, the extra I just cut off before applying the side borders. When you Miter corners, sadly you have to measure:(
1. Measure your quilt top and bottom and come up with an average or common measurements for the top and bottom. Then you add the width of the border twice, plus an additional 6 inches. For example if your quilt measures 48 inches across and your border will be 5 inches you add (48 + 5 + 5 + 6 = 64) Therefore your total border length before you sew it on needs to be 64 inches in length. (This is another place where I would run into problems. Somehow I never seemed to have enough extra fabric, probably because I never MEASURED. Curse My impatience!)
2. Now find the center of your first border strip and the center of the edge of your quilt. Mark these with a pin. You can pretty much eyeball the center by folding your border/quilt in half and marking the fold with a pin.
3. Next divide your average width measurement by 2. (In my example average quilt width was 48 inches. When I divide this I get 24 inches.) Measure 24 inches out from center pin on your border, in both left and right directions, and place another pin. These pins will mark your corners. By following this step I have found that this greatly decreases the puckers and waviness of my borders.
3. Pin borders to quilt top and bottom, matching centers and working out to the corners.

4. Sew on borders starting 1/4 inches in from corner. Press your seams out towards your borders.
Please watch where you stop and start your borders. You do not want the border stop or start points to overlap. There should be a small space without stitching right at your corner.

5. Repeat steps 2-4 for side borders. If your quilt is a rectangle your average side length will be a different measurement than your width average. Make sure to measure your quilt in both directions, even if you think, it looks square.
This next part is where it gets a little tricky.
6. Once all borders are sewn on and borders are pressed, lay the quilt out on a flat surface, face down. Your border edges will now overlap.
 7. Using a ruler with a bias line (that funny looking line that divides the square into 2 triangles. Yeah that one) Line up the bias line with the edge of your border so that the straight edge of your ruler creates a line from the top of the borders to the corner of the the quilt body. Mark along this line. (Helpful Hint: I used one color to draw the line and another color to indicate my starting position. With the starting position marked clearly I was able to prevent puckers and holes in my corners.)

8. Now swap the border that was on top with the border that was on the bottom and repeat the marking of the border.

9. Now fold quilt on the diagonal so that right sides are facing and border strips face one another. Using your pins as a guide place one pin at a time, starting at inside corner. Push pin in at marked line on top border, through both borders to the other side, directly on the marked line of back border. Be sure that lines match up.
If you are mitering more than one border, it is much easier to get seams to match up if the borders are all sewn together before attaching to quilt.

10. Now stitch line starting at inside corner and working out. I do not back stitch here. (living on the wild side.) I always leave a long tail for easy adjustments. This way if I need to pluck out a few stitches I can without having rip out the entire seam or re-sewing the entire corner. (although some corners scream: SEAM-RIPPER!) When I am sure the corner will lay the way I want, I tie the tails in a square knot, just as if I were making a dart.

11. Press corner and seam open before trimming seam to 1/4 inch.


With this last quilt I decided mitered corners were a must! And they do enhance the 'diamond' effect of the quilt. In order to get my corners to lay flat, I had to look at mitered corners from a fresh perspective. For those of you who sew clothing this will make more sense. This is how I went about it.
Mitered Corners are nothing more than a 'dart'. The quilt borders has an excess of fabric around the circumference not unlike many of my daughters elastic waist pants. To get my daughters pants to fit correctly I have to sew darts in the waistbands of most, if not all of her shorts. This same principle I applied to the borders of my quilt.
The first step is to add extra length to your borders, meaning you have to measure. If you are a lazy quilter like me you typically don't measure the sides of your quilt. I usually hold up my fabric to the quilt and estimate the length I need, the extra I just cut off before applying the side borders. When you Miter corners, sadly you have to measure:(
1. Measure your quilt top and bottom and come up with an average or common measurements for the top and bottom. Then you add the width of the border twice, plus an additional 6 inches. For example if your quilt measures 48 inches across and your border will be 5 inches you add (48 + 5 + 5 + 6 = 64) Therefore your total border length before you sew it on needs to be 64 inches in length. (This is another place where I would run into problems. Somehow I never seemed to have enough extra fabric, probably because I never MEASURED. Curse My impatience!)
2. Now find the center of your first border strip and the center of the edge of your quilt. Mark these with a pin. You can pretty much eyeball the center by folding your border/quilt in half and marking the fold with a pin.
3. Next divide your average width measurement by 2. (In my example average quilt width was 48 inches. When I divide this I get 24 inches.) Measure 24 inches out from center pin on your border, in both left and right directions, and place another pin. These pins will mark your corners. By following this step I have found that this greatly decreases the puckers and waviness of my borders.
3. Pin borders to quilt top and bottom, matching centers and working out to the corners.

4. Sew on borders starting 1/4 inches in from corner. Press your seams out towards your borders.
Please watch where you stop and start your borders. You do not want the border stop or start points to overlap. There should be a small space without stitching right at your corner.
5. Repeat steps 2-4 for side borders. If your quilt is a rectangle your average side length will be a different measurement than your width average. Make sure to measure your quilt in both directions, even if you think, it looks square.
This next part is where it gets a little tricky.
6. Once all borders are sewn on and borders are pressed, lay the quilt out on a flat surface, face down. Your border edges will now overlap.


8. Now swap the border that was on top with the border that was on the bottom and repeat the marking of the border.

If you are mitering more than one border, it is much easier to get seams to match up if the borders are all sewn together before attaching to quilt.

10. Now stitch line starting at inside corner and working out. I do not back stitch here. (living on the wild side.) I always leave a long tail for easy adjustments. This way if I need to pluck out a few stitches I can without having rip out the entire seam or re-sewing the entire corner. (although some corners scream: SEAM-RIPPER!) When I am sure the corner will lay the way I want, I tie the tails in a square knot, just as if I were making a dart.

11. Press corner and seam open before trimming seam to 1/4 inch.

12. Repeat on remaining sides then....Sit back and enjoy your beautiful corners!
8.28.2011
Inspiration Has Struck
Remember this Quilt?

I started it way back in April, maybe March. I got this far and then I stalled out of ideas. I also became involved with a ton of other projects. I posted this picture and asked for suggestions. I got a great idea from Camilla who suggested the use of Gray solid. That idea got wedged into my quilting psyche and stuck there. When I picked up the quit to finish the border, the gray was the first thing to go on. Another suggestion I received, was to carry the diamonds into the border. At first I wasn't sure if this would work with the gray, that now I had to have, so I started to play around with it a little. I finally came up with this block.

I decided to add a white and gray border with a few scattered diamonds carried off onto the borders. The only problem this created was that I knew I would have to miter the corners. I have tried several times to miter the corners of other quilts, only to end up with puckered corners. This time I tried a new technique and it worked. Yahoo.

I have to decide on a backing and purchase some white batting and we will be ready to quilt.
8.22.2011
Yea Me!

Imagine my surprise and elation yesterday at finding this Email in my Inbox--
Hi Kristen,
Congratulations! You have been selected as a finalist for the 9 by 12 Transformation Challenge being held at Day Style Designs Online!
As a finalist for the contest, your name and quilt title will be shared on The Free Motion Quilting Project tomorrow morning, but I wanted to contact you personally to let you know a day early.
Thank you so much for your participation in this challenge! If you have any questions about this email or how to pack and ship your piece, please feel free to reply to this email and ask!
Have a wonderful day,
Leah Day
You may remember my struggles with this quilt and my indecision regarding entering the competition. It is so hard to put yourself out there and have others judge you!
Years ago, I was a Gymnast. Competition was what it was all about, the bottom line was winning. Winning was what the coaches wanted. Always we were pushed harder and further than before. The pressure became unbearable and I quilt. I realized it wasn't fun anymore. I didn't enjoy it. No matter how hard I worked, how much I trained to my young eyes everyone was better than me. At this point I swore off all competition
When I entered my Junior year in high school, I knew that I was going to try to seek out some art scholarships. My art teacher encouraged the development of my portfolio. I applied for and was accepted at several art schools. I even managed to achieve a partial scholarship to one. By senior year, I was nervous and intimidated by all of those who I deemed better than me. I panicked. I couldn't face the thought of being Judged. Of being Judged not good enough. I was worried that the art that I loved would, over time, become a chore, a struggle to succeed. I didn't want that. I wanted it to remain an outlet, something fun. Ultimately, I bailed on Art school and jumped into college totally lost.
I created this quilt for me. My decision to enter it into the Transformation Challenge was not taken lightly. I didn't know if I could put myself out there again. Through some deep and personal searching, not to mention lots of encouragement from family and friends I did enter. I came to realize that I am Ok with this.
This quilt, A moment of Time, has become my mantra. Let me take it one step, one moment at a time. For now, today, I am proud of who I am. I am proud of what I accomplished. So my quilting may not be the best. It is my best. It is who I am. Accept it or Not. At this moment I am me.
Today, I ship off my quilt to once again be Judged by someone else. To be scrutinized over, picked apart, analyzed and evaluated. There are 14 finalists. Only 8 will be chosen. We are all putting ourselves out there, our work, our passion. For one Moment in Time we will be Judged. Then it will be over. Life will go on. Whether or not I am chosen, I know I achieved personal success, because I took a chance. Succeed or fail I am proud of what I did.
Stop over and check out the other 13 finalists at Leah's Blog. We are all awesome quilters.
8.18.2011
The Southern Album Quilt

 |
| Friendship Star with Friendly Berries |
I can now jump back into that project, along with several others and try to create a block a month. This quilt requires a lot of hand applique which should be perfect for all of the sitting I seam to be doing this fall. With Soccer, Piano, Exercise class, dance class, Girls on the Run and doctor's appointments filling my schedule I should not run out of 'sitting and sewing' time.
With Block one finished I sewed up Block 2 RailRoad Crossing and Indigo.
 |
| RailRoad Crossing |
The applique is the next step.
8.17.2011
Letting out the breath I didn't know I was holding...SIGH
SIGH.. I can finally let out a deep breath. They are all back in school! Today marked the first day of school for my three. I have all three at different schools this year and it is going to be one crazy year!
The day started out peacefully enough, Emma and I were the only two up. We sat and had breakfast, fixed our hair and got her ready for her first day as a fourth grader. (I only got one eye roll and she only snapped at me once.) All in all a good morning. I woke the boys up as I walked out the door to take Emma to school. As soon as we got within a block of school, I knew I was in trouble. The line, just to pull into the school, stretched around the block. At this point I wished I had gotten everyone up earlier. It took me one and a half hours to get everyone to their respective schools. Traffic was terrible. There were multiple accidents. It appeared everyone in Lexington was taking their kids to school today. Fortunately, everyone got to school before the tardy bell, but just barely.
Now that they are all in school until 2:30 when the chaos starts all over again. Until then, I can do whatever I want! Yahoo! Should I go shopping for myself? (crazy, I know!) Oh, I could drink coffee and read a book, without being interrupted. (Insane) I could even go get a pedicure and be confident no one would be home to step on my newly painted toes. (preposterous!) Or get this, perhaps I could carry on a phone conversation with a friend, just for FUN! (NO WAY!) The possibilities are endless.
Whatever I do choose to do, I know I will miss them all.
 |
| Ginger ready to take them all to school |
 |
| Emma is a 4th Grader |
The day started out peacefully enough, Emma and I were the only two up. We sat and had breakfast, fixed our hair and got her ready for her first day as a fourth grader. (I only got one eye roll and she only snapped at me once.) All in all a good morning. I woke the boys up as I walked out the door to take Emma to school. As soon as we got within a block of school, I knew I was in trouble. The line, just to pull into the school, stretched around the block. At this point I wished I had gotten everyone up earlier. It took me one and a half hours to get everyone to their respective schools. Traffic was terrible. There were multiple accidents. It appeared everyone in Lexington was taking their kids to school today. Fortunately, everyone got to school before the tardy bell, but just barely.
 |
| Jack starts Middle School |
 |
| Mark is a Freshman |
Whatever I do choose to do, I know I will miss them all.
8.15.2011
Drinking and Quilting Coffee
Last week I finished up this cute little coffee mat and napkin set. I had every intention of posting about it when it was finished and then life, as it does, got in the way.

If you know me, you know that I LOVE Coffee. I live on coffee. I could not get through an entire day without coffee. Okay, you get the idea. When I saw this pattern, Cafe Espresso in McCall's Quilting March/April 2011, I immediately ordered the fabric. Then it arrived and I dreamed about sewing it up. Then, once again, life happened and the fabric sat and sat. It sat for 5 months before I even began to sew it. And now it is done, finished, completely all sewn up,(pardon the pun).
 I put all 4 place mats on my long-arm machine and quilted them at one time. What a time saver. I quilted a rolling swirl all over in an attempt at mimicking the steam from a nice hot cup o'joe.

The pattern makes 4 complete place mats and napkins. Too Cute. I know the recipient of this gift is going to love it! I was really tempted to keep it!


If you know me, you know that I LOVE Coffee. I live on coffee. I could not get through an entire day without coffee. Okay, you get the idea. When I saw this pattern, Cafe Espresso in McCall's Quilting March/April 2011, I immediately ordered the fabric. Then it arrived and I dreamed about sewing it up. Then, once again, life happened and the fabric sat and sat. It sat for 5 months before I even began to sew it. And now it is done, finished, completely all sewn up,(pardon the pun).


The pattern makes 4 complete place mats and napkins. Too Cute. I know the recipient of this gift is going to love it! I was really tempted to keep it!

8.11.2011
playing opossum
Our home backs up to a farm. We have many farm cats, strays and litters of kittens that wonder through our yard. Since this spring we have caught and hauled to the shelter 7 cats. We are fortunate that our neighbor has a daughter-in-law who works at the no-kill shelter here and can find homes for many of these cats.
Several weeks ago, while my family was here visiting, 2 cute gray kittens wondered onto our porch. We tried in vane to catch the little buggers, but failed miserably. However, I do believe we succeeded in entertaining our neighbors as they watched 3 grown women and 6 kids scurry around the yard, calling here kitty-kitty and making kissy noises. Eventually, Ginger with her mad hunting-dog skills, pinned and almost ate one of the kittens. Fortunately for the kitten, Ginger can hunt, but she is not at all quiet about it. The kitten was rescued, fed and taken in by one of my sisters.
Since that time we have been trying to catch the second kitten. Sadly however, we have only caught the 2 barn cats that live behind us and 1 really stupid and stinky opossum. The opossum, has been caught 3 times. I think he must have a fondness for kitten food. Either that or he loves the new all night diner we have installed, all you can eat, free accommodations and you are released without charge come morning. Perhaps he is not so stupid?
Last night we set the cage up with a full plate of kitty food and went to bed. I wasn't really shocked to find that once again we had caught the opossum. What did shock me was that in his anxiety filled state he had attempted to chew through the metal cage. His attempt, while being unsuccessful at releasing him did managed to entangle him. Somehow, this really stinky and filthy opossum managed to get his lower jaw up under the lower cage wire. Not only was his jaw wedged up under the wire but his canine teeth were hooked over the wire above preventing him from untangling himself. When I found him his jaw was cut and bloody. He was one really stinky pissed off opossum.
At first I thought maybe if I opened the cage door he would be able to untangle himself and waddle away. This only got me an eye roll worthy of any high school student, from an opossum no less. Okay, so he was really stuck.
Adding to the disaster was Ginger. Ginger found the entire event incredibly interesting and almost knocked over the fence trying to "help" free the opossum. I drug the trap filled with the stinky opossum over to the back of the yard. Now Ginger thought this was GREAT! A new game called: Let's chase Kristin while she drags the cage! Did I mention it was 6 am? If my neighbors were wondering about us before I can only imagine what the HOA will say now.
Once the cage was situated in the back yard, I tried helping the opossum. I opened the trap and with the really long stick I tried pushing the lower jaw of the opossum back through the wire opening. The only thing preventing the opossum from being free was his canine teeth. I could not get the teeth unhooked and the jaw pushed back simultaneously. I am not sure, but at this point I believe the opossum actually sighed at me! I am sure that the look he gave me clearly said, "Please, I beg you. Stop helping." So I left.
I sent John a brief text that said, "Caught opossum again. Jaw stuck in trap. Will either bleed to death or die of starvation." I can only image the look on his face when he read this. Priceless. As you can probably guess he called right back. He suggested I get gloves and a pair of channel locks and bend the cage wires to help free the opossum. Now I ask you what wife, in her right mind would say, "okay" to this. I explained to John that the opossum did not want my help. He didn't by it.
Clearly not in my right mind, I trudged outside. With my cell phone on speaker, my channel locks, my canvas gloves and a rag wrapped around my nose and mouth I headed out to free the opossum. By now I am sure my neighbors were on the phone to the animal control. "Hello? Yes, my neighbor is trying to kill a opossum in her back yard with a pair of channel locks."
As I approached the cage the opossum, now laying on his side, clearly exhausted, was trying to will his jaw loose. I set the phone down, and tried to bend the wires on the trap. I talked to Stinky the Opossum (Did I mention he stunk) while I tried to free him. He did not look comforted. Let me just say those cages are strong! I was able to bend the bars slightly around the opossum's jaw but due to his position and the swelling in his jaw I was unable to get the wires holding his jaw. I tried smaller pliers and still the space was so tight that did not have enough room to maneuver the wire away from his teeth.
After 5 minutes Stinky and I had to have a serious talk. I told Stinky that he was either going to have to wait until John got home or I was going to have to extract his tooth. From the loud hissing sound that came from the cage, clearly he did not like his choices. I sympathized with the little fellow but hey, life is full of tough choices. I took the pliers and pulled. A small piece of tooth broke free but it still was not enough to free Stinky.
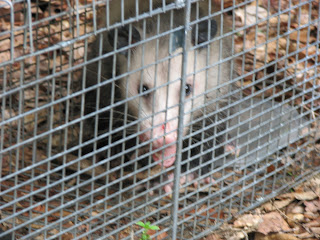
Now he was really pissed! He hissed, clawed at the cage, whipped his tale and had that crazy opossum look in his eyes. Okay, now I was getting freaked out! I had visions of this rabid opossum breaking free and chasing me through the neighbors yard. I looked at Stinky and he looked at me and I told him, "Hey, Don't get sassy with me. I am trying to help you here. Oh, and by the way if I do free you please do not come after me. Okay?'

With one last pull Stinky's tooth was extracted and he was freed. True to his word he did not chase after me. He did not move at all. He just sat in the trap looking completely terrified. 2 hours later I went out on the deck to peer over at Stinky. I was not about to go anywhere near that cage now that it was open. I watched as a humiliated and battered Stinky waddle away into the drainage ditch. I can only hope that this has taught Stinky one very valuable lesson. Never bite off more than you can chew, or you may loose a tooth.

8.09.2011
2 Little Mittens for 1 Cute Kitten
Wow! Where has this summer gone? Just when I think I have a handle on it, BOOM, someone throws me another curve ball. In-between running, running and more running I have had a few, I'll be it very few, minutes to do a little knitting.

I knit up this hat several months ago and I wanted to knit up mittens to match. I couldn't find a pattern that matched so I came up with my own. Using the Knitters handy book of pattern, standard mitten formula I came up with these cuties.

I have to say they make a cute set. I added the white stripe just before the gusset increases. Then I took the large heart from the hat pattern and added it between the cast off for the thumb and the decrease for the mitten top.

Hopefully these will keep one cute little Kitten warm this winter, assuming of course that she doesn't loose them.

I knit up this hat several months ago and I wanted to knit up mittens to match. I couldn't find a pattern that matched so I came up with my own. Using the Knitters handy book of pattern, standard mitten formula I came up with these cuties.


Hopefully these will keep one cute little Kitten warm this winter, assuming of course that she doesn't loose them.
Subscribe to:
Posts (Atom)